Thursday, December 11, 2014

Hour of Code

As the end of the event draws closer, I can't help but to keep reflecting on some of my most difficult students doing extremely well with the hour of code. Some of them worked through multiple tutorials within the hour I set aside for them, others were super excited about the lines of code they created. One student decided to download ruby on one of the Linux machines in the computer lab and started to learn that language.

Here is how I presented the Hour of Code to my students; but first some background...

It was cold, snowy and all the students were hoping for a snow day. However, school was on as scheduled, and let's just say that not all students were excited about this. In fact, it seemed that the only thing on their minds was "when are they going to call an early release?" My riveting lesson planned out on weather fronts, was just not going to grab their attention today. Even though we were currently experiencing the results of a weather front, I could sense that students were going to be rather challenging. I had already planned out the hour of code to take place the following day, and have been slowly increasing students interest  in coding over the last few weeks. So, here we are, extremely grumpy  and unmotivated students, and an excited teacher...a match made in heaven, right? How did I deal with this lackluster crew? I was planning on starting the lesson with a writing prompt pulling concepts from the previous few lessons, but instead I put these directions on the board...

Answer the following questions as honestly as you can based on how you feel right at this moment...
1) What is the single greatest video game of all time that carved the path for the evolution of gaming? 

2)  What was the worst game you ever played, and what system was it for? 

3) If you could rate the level of frustration about not having a snow day on a scale of 1 to 5 (5 being the point at which your inner hulk takes over causing you to spike your controller on the floor) what would it be? 

4) Would you rather learn how to code video games, or continue learning about the awesome meteorologic concepts I had in store for you today? 

I'll give you one guess what 99% of all my students put for question 4.

OK, long story short, I moved the hour of code to that moment, and the buy-in was phenomenal.

Everyone was working well together, the moods were upbeat,  they were excited to learn, and wanted to learn more. A few students skipped the break between blocks to stay in the science computer lab to do more, instead of socializing with friends. I have had students stay behind before to finish up a lab, or finish a thought on a paper, or finish tweaking some design, but usually the attitude is all business. This was different, this was pure enjoyment, excitement, and learning at that Utopian level you read about and build up in your mind, until that first day on the job when you are violently hurled back to reality.

The point is, the Hour Of Code is an amazing tool to engage students in learning and understanding the need for coders. What was once stereotyped as "geek," transformed into something socially acceptable among teenagers, to the point of trending. If you haven't participated in the hour of code, all I can say is...you have one day left for this year, sign up for next year, and in the mean time direct students to codecademy to learn more.

Wednesday, December 10, 2014

Sparkline in Google Sheets

Being without internet for a significant amount of time, has changed my perspective of technology use in education. I was victim to this attitude and I see it with many colleagues; since I have access, I just assumed that all my students do as well. As soon as I lost access, I realized that there are still folks out there who have no service at home or have limited access, for various reasons. This helped me redirect my efforts to really enhance technology use in the classroom only, and not push to hard for use outside of school. Not everyone can get online outside of the building. With this new paradigm shift as I finally have service back, I decided to share a nice feature added to Google spreadsheets, that helped make teaching data analysis a bit easier today.


I stumbled upon this great feature today with some students. I had them analyzing weather data for trends to determine how air pressure, humidity, temperature and general conditions are related. They were pouring through three months of data pulled from the Wunderground archives. Students were expected to grab the CSV format data for three consecutive months of this calendar year and dump it into a Google spreadsheet to identify and describe correlations between specific data points. Typically I have students sort data, and create various charts and graphs to help them visualize the relationships, but the new Sparkline feature in a single cell, helped to streamline this process. If you are unfamiliar with this option, all it lets you do is insert a small little trend line in a cell that graphically displays the data selected. Dealing with 3 months of data (which is about 90 days worth of numbers), this tiny visualization quickly showed students if factors were increasing or decreasing. They were then able to use this tiny bit of information to help them analyze larger graphs to draw better conclusions. (On a side note, I still had students struggling with expressing their conclusions through good scientific writing, but they will get there).

So, here's how to use this nice new feature.

  1. Create a Google Sheet
  2. Input some line or column of data
  3. At the end of the cell type "=Sparkline" and let the built in google helper take over from there. 
  4. This function will drop a nice little graphical represnetaion of your data in the cell. There is some information lacking, but it will show you general increases or decreases in data. Students loved it. 


Friday, December 5, 2014

Internet Service Provider

For those of you that follow this blog, sorry for the delay in posts, recently. Our internet line outside of the house broke in half in a recent winter storm and we are still without service. It is a frustrating experience when the only provider in the area is Fairpoint, who clearly does not work to try and meet customer need and return service as quickly as possible.

 Here I am; a technology nerd who likes to offer free advice, tips, and tricks about using these tools with students, stuck without any connection to the world wide web. OK, I have a cell phone, but the data package is small, and ridiculously expensive if you exceed your data limit. So, what am I to do without access to the amazing online tools?

It has been an interesting experience, I now understand the frustration of students who also have no service at home for various reasons. It makes me wonder if the push for more technology in education is worth while, when the communications system is so ancient that one storm could render you without service for days, or in my case months. How can I be available to assist my students, who I've pushed to use so many online tools and expect to have classroom updates on Google classroom every night? It has been an eye opening experience to realize that there may be too much technology dependence in education. While I await Fairpiont to finally do some work, which looks like they won't do anything until spring, I need to figure out how to include technology without having access myself. Should be an interesting challenge.

Tuesday, November 25, 2014

Technology Renaissance

Sorry, but this post has no tips, suggestions, or tricks. It is simply me reflecting on what teaching has become, and the amazing students we have to work with.

As a teacher I work with a wide variety of students with a even more broad range of abilities. Every student is an individual, and has individual strengths. One thing that is common among all my students is that they have successfully harnessed different realms of technology to blossom into a new age of Renaissance. That's right, I said it, Renaissance. You know people like  Leonardo da Vinci, or Nicolaus Copernicus. OK, I know what your thinking...Alchemy was a Renaissance failure, true, but with the knowledge and technology available at that time,  would it be so far fetch to think that on atom could be changed into another? Now we all know that is impossible, unless of course you were in a supernova explosion, or in an astrophsycial jet...the point is, some of the Renaissance ideas were proven wrong, yet they also gave us some great ideas, art, literature, and song. The time period allowed everyone to express themselves through various creative modalities. You might be thinking of your own students and reflecting on how horrible you were treated today, or wondering why your lesson did not go as well as you hoped for, but keep reflecting, and look closer. What would have happened if that lesson had some technology? or what if that lesson had technology presented in a different way?  What would happen if you harnessed creativity and not forced the typical idea of the Common Core into your students brain? How would your students flourish? What do they need to flourish?
Image: Vitruvian Man by Leonardo da Vinci, Galleria dell' Accademia, Venice (1485-90)
Obtained from 
http://commons.wikimedia.org/wiki/File:Da_Vinci_Vitruve_Luc_Viatour2.jpg

For example, I just wrapped up a unit incorporating robotics and programming with the study of volcanoes in an Earth Science class. I also just wrapped up a differentiated project focused on extreme weather conditions in a different earth science class  I also wrapped up an ongoing geologic field study. One of these three scenarios clearly has more STEM initiatives obviously integrated. Yet, another,  has more of a STEAM flavor, and the other has more of a placed based approach.  In each scenario I was able to see students be creative and present amazingly unique  finished products. I had a team of students design and program a robot to navigate through an obstacle course to a "volcano" to find a hidden piece of Amethyst, while playing the Super Mario Brothers Theme song, using only 5 lines of code (this includes the code needed to play the Super Mario song they organized through the various sounds they could produce out of the robot, set to repeat). I also had a student "hand" draw diagrams of the structure and formation of hurricanes. These vector drawings were enhanced to show 3D using only sumo paint.  Give me a piece of paper and a pencil, and you're lucky if I could produce a legible stick figure. Finally, I had students using their androids to create field maps that accurately displayed their randomized samples of a geologic site to determine the primary rock type present, and mark clues to suggest incidents of faults and folds.  I gave these students a task, a goal, and some tech tools to aid their quest. They were able to tap into their own creativity and problem solving to  produce things that I couldn't even anticipate.

As educators, we are flourishing in a time of creativity and possibility. The limitation is our own ability to loosen the reigns and allow our students to show us what they can do with the technology they have readily available.


Sunday, November 16, 2014

Google Keep with Google Classroom

Since Google Classroom has been released my classroom has been much more streamline. Everything that my students might need is conveniently organized in one location. Students can track  assignments, obtain their feedback much easier, and resubmit work much quicker than before. The way that I run my classroom is a pseudo-flipped environment. Not every student has equal access to technology at home, our school does not provide a 1:1 program, and the attitude to try and adopt a program is very obtuse. I also do not use a traditional text book with students, for various reason which will end up in another blog post, I also have my students doing a lot of science rather than me telling them about science.

With all that said, I often ask students to research a concept and take notes on about the important pieces before we apply what they know and learned. The research is always partnered with teaching students how to validate resources, effectively search Google based on reading level,  obtain quick accurate information, and how to appropriately cite information collected. To do all this I ask students to take notes. And, why not? Notes are a good way to help trick your brain into remembering things you may not be all that interested in learning.

Previously, I had students keeping notes in a notebook where they would hand write their notes. Which is an important skill that is still needed, however, it is sometimes easier to keep digital notes. Not only are they more legible, but they won't get lost in a backpack, locker, or the dogs mouth. I have since shifted to have students take notes with Google Docs. Only because Evernote was another place for students to have to remember where to go,  and Springseed only worked for those running Linux. All  of my students have a Google account and know how to access it easily. I discovered that Docs works well for some students, who heed suggestions about keeping one large document complete with a table of contents and headers.  But then, I ran into a virtual "dog" in Google Docs. What started to happen was that, students were not keeping one document, but making a separate one for each note taking event. Which could still work, however they were not organizing their files and folders in Google Drive and were not naming their documents. A students drive would be flooded with documents called "untitled." As much as you can try and keep a student organized, there are some who have selective hearing and are masters at ignoring teacher suggestions.

So, I needed another solution. One that would force students to include a header on notes, be able to access quickly, and be able to easily see  what was written.  I ended up turning to Google Keep. I know this tool was more designed to keep short "sticky notes" as reminders, but it also works really well for students to take notes on short concepts and keep them all organized on one screen  For now, it works, and the virtual "dog" has yet to have a satisfying meal.

(screenshot of a students Google Keep notes)

Saturday, November 8, 2014

Rubrics With Google Forms

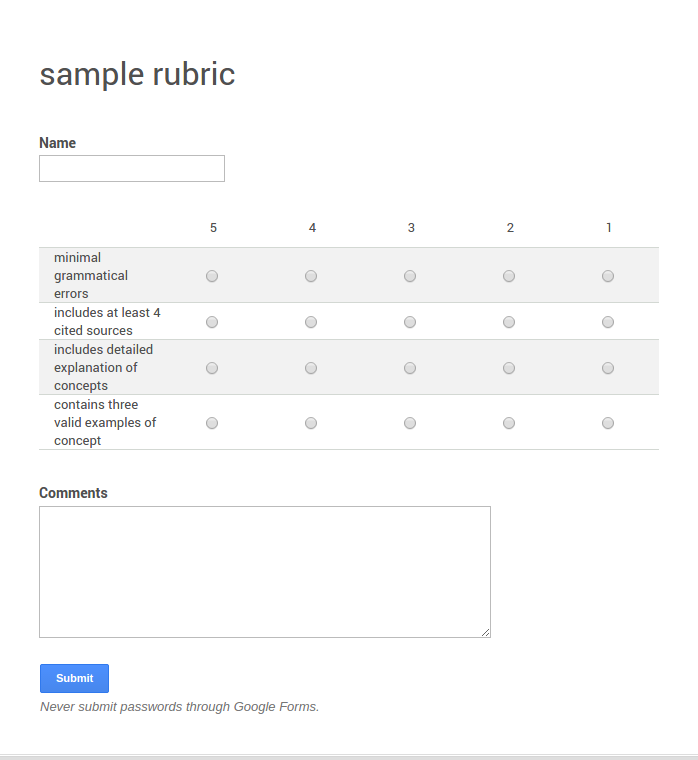
Many teachers use rubrics as a way to rate student performance. They are a great tool to provide feedback to students, as well as provide students with a benchmark before they even start the assessment. With the push to include more technology in the classroom, filling out a rubric with a pen and paper seems a like taking a step backwards. There are some cool tools like Doctopus and Goobric that allow a rubric to be attached to an assignment, and it works through Google classroom, but sometimes it just doesn't work the way you want. I've run into issues with these scripts many times, to only find myself ditching the technology for pen and paper. Here is a fail-safe approach to digitizing your rubric.

Use Google Forms!

I know it's old news, but it is a solid solution that works, all the time.  Here is how:


  1. Create a Google Form
  2. Name the form something that is related to the assignment
  3. Insert a text question "name"
  4. insert a grid question,
  5. fill the 'row" selection with your criteria
  6. Fill the "column" section with your scale
  7. insert a "paragraph question" called comments
  8. publish and done. 


Now wasn't' that simple? 

Depending on how you set up your rubric, you could even set up an auto-grade function with an add-on, or write a short equation to auto-grade for you. Here's how.


One way, that doesn't always work the way you want, but sometimes fits the bill;
  1. use Flubaroo
  2. Go to the form spreadsheet
  3. click add-ons
  4. install Flubaroo

The other way that is just as easy. (maybe easier) 
 (this depends on how you are grading your rubric. This equation assumes it is out of 100%) 

  1. insert this equation into the column where you want your totals
  2. =(Sum(C2,D2,E2,F2)/20)*100


  1. If your rubric is using text instead of number use this equation
=if(right(B3)="!",4, if(right(C3)="!",3, if(right(D3)="!",2, if(right(E3)="!",1,0))))

Where "!" is the text you have in your form and the number 4,3,2,or 1 is the value you wan't it to associate with. 


(If you want to use these formulas and need more assistance, send me an email, I will be glad to help)


Sunday, October 26, 2014

Googlel Form Notifications...Add-on!- of course

This is an update to a previous post that is well needed. No sooner than I hit the publish button, Google decides to launch Add-ons for Forms. Which includes, as the first option, form notifications, which sort of negates all my previous directions. So now, the once overlooked option is right in your face. To set up notifications, simply start a form, click add-ons>get add-ons and look at the first option. Just like that you can get email notification of form submissions.


The other nice thing is that the add-ons now include gMath, which support the inclusion of graphs, expressions, and stats. Previously you had to do some funky cut and paste trickery to get these expressions to fit neatly into the form, Now the add-on does the hard work.


While you're at it, explore the other add-ons, there are some goodies in here to help make your forms that much better.

Saturday, October 25, 2014

Google Form Submission Notifications

Google forms are a really convenient tool to collect data from students, and teachers with ease. It's nice to be able to present a form online for viewers to provide you with information and have it all magically organized in a Google Sheet. Where you then have the freedom to manipulate whichever way you choose. This might be manipulations directly in the spreadsheet, or manipulations through Fusion Tables. (on a side note, if you haven't tried fusion tables for you data, do yourself a favor and check out this tool, it is a serious time saver.)

Recently I had some colleagues ask me if there was a script I could write, or one I could direct them to that would send them an email notification of a form submission. While my head swelled an enormous amount at the fact they thought I could scribble out a form script on demand, I pulled myself together and brought to their attention, a small overlooked feature in a linked Google Form Sheet. Here is the quick and easy way to get notifications of form submissions, or any changes made to your Google Form Spreadsheet.

1) First, create a form that will collect a lot of data that you would require some notification. This is important. You don’t' want to flood your gmail with unimportant notifications of a form submission.

2) Once the form is created, link a Google Sheet to the form, and navigate to that sheet. It doesn't matter if there are any submissions yet.

3) On the newly linked Form, click   Tools>Notification Rules...


4) From here, you are presented with a pop-up window with a lot of different choices. Choose the one that best fits your need and just like that, you will now be alerted to the traffic on your form.


5) Optional- once you set a notification rule; create a gmail filter to redirect  all those new notification into one spot for better organization.

Thursday, October 16, 2014

Online Photoshop

I know I'm a bit behind the times with this post, but I just stumbled across this at a useful moment. Photoshop now offers an online editing tool.  If you are using a device like a Chromebook and have the need to edit photo's and have found other online tools to be lacking in some way shape or form, you can now use photoshop online to make those quick fixes. The tool allows you to upload a photo, have access to the popular photoshop tools, make changes to your photo,  then download the "fixed" image back to your device. It doesn't require anything except access to the internet, a picture to upload, and a place to save it when you finish your edits.

I found the online editor to run very quick, and offer some great tools to edit photos. There are some limitations to the file size and formats you can use. The tool wants a file no bigger than 16 megapixels and in JPEG, JPG,  or JPE formats. However small these limitations are, they are expected for a free online tool.


Once your image is loaded, you have a wide variety of tools to adjust your photos. Most of these options are just like the actual Photoshop, where there are auto presets to help guide you through  fixing of your image. Again, being a free online service there are limitations to your creativity, and customization. The tool only gives you access to presets that perform "auto adjustments." If you are using this for simple quick fixes, it is a fantastic tool. Let's face it, if you had some serious edits to do, you would purchase the software.


When you finish your edits, you are prompted to download your fixed image. I haven't found any cloud storage yet, even with an adobe account, there is no obvious, free, option to allow you to save your work to the cloud. However, you can still download your creation to your device to be able to archive to your favorite cloud tool.


If you are familiar with photoshop, and have the need for very quick photo edits, with easy presets, then give this new tool a try. It's free, and it's photoshop.

Wednesday, October 8, 2014

Common Core State Standards and Google Classroom


I was recently asked by a colleague to convince teachers that Google Classroom can either help students meet the CCSS requirements, and/or help teachers deliver the best CCSS content. The common core state standards are a set a guidelines for teachers to ensure that what they are teaching is helping to create "career and college ready" individuals who can become effective members of their community. What is an effective member of a community, well that's an entirely different story. The point is, that Google Classroom is simply a tool that can be integrated into teaching. How teachers implement the tool and integrate the common core into their classroom determines whether or not the tool will be effective. Google classroom is a virtual classroom space where teachers create a flipped environment, and provide students with a common place to ask questions, collaborate on school work, hold discussions, access quality content presented by peers or the teacher, and learn how to acquire information from various media sources. This list, hardly skims the surface of what Google Classroom is and can be for teachers. But, the issue at hand is the alignment of Google Classroom to the CCSS.


The common core states the following about technology:

      Students employ technology thoughtfully to enhance their reading, writing,
      speaking, listening, and language use. They tailor their searches online to
      acquire useful information efficiently, and they integrate what they learn using
      technology with what they learn offline. They are familiar with the strengths and
      limitations of various technological tools and mediums and can select and use
      those best suited to their communication goals.
      http://www.corestandards.org/wp-content/uploads/ELA_Standards.pdf


     Mathematically proficient students at various grade levels are able to identify 
     relevant external mathematical resources, such as digital content located on a 
     website, and use them to pose or solve problems. They are able to use technological 
     tools to explore and deepen their understanding of concepts.
     http://www.corestandards.org/wp-content/uploads/Math_Standards.pdf

Those are only two examples that discuss technology and content skills. If you were to sift through both of those documents in much more detail, you will find the application of technology integrated through most of the standards. So where does Google Classroom fit into all this?

I use Google Classroom as flipped environment to facilitate learning, and help students acquire skills to sift through various media to extract relevant and important information. I also use Google Classroom as a place for students to turn in assessments, receive feedback on assessments, ask questions, receive extra help, and simply share ideas with each other.

So, is Google Classroom a tool that can deliver the common core and/or help students meet the CCSS? Absolutely, as long as the teacher understands the CCSS and understands how to best use these guidelines in their practice to ensure that students are gaining the appropriate skills for the content.  The tool is not replacing the teacher, the teaching is using the tool to help streamline their efforts towards the CCSS.

Saturday, September 27, 2014

Google Classroom with Co-Teachers

Google classroom is a great tool with so many useful features. However, there is one tiny flaw; currently there is no easy way to build a classroom with multiple teachers. The tool only allows for one user to be the "teacher" or administrator to invite students, create assignments, grade assignments, view submissions, return submissions...etc. Which presents a problem if there are co-teaching scenarios, or if you are using the classroom for PLC's or other purposes where multiple teachers would be helpful.

Here are two possible workarounds. 

1) Share the classroom folder from Google Drive with the other teacher as an editor. The other person may not be able to access Classroom as a teacher, but they would be able to see and edit student work when "turned in." 

2) Use a shared or generic Google account in the domain. There is bound to be at least one test user, if not, I'm sure the administrators would be willing to create one for this purpose. This would allow both teachers to sign in, and assume the role of the teacher simultaneously. 

For now, these are two helpful options until Google addresses recent feedback and makes adjustments to this powerful tool. 

One thing we can do to help get this feature added is to use the "send feedback" option at the bottom of the tool. The more of us who point out the missing feature, the more likely it is to get fixed.


If you haven't used Google Classroom yet, take some time and build a classroom for you students. You will appreciate the simplicity and ease of use, and your students will appreciate how the classroom streamlines the collaboration process. Do not hesitate to send feedback, it will only help make the tool better. 

Wednesday, September 24, 2014

I just had one of those "AHA" moments.

I've used QR codes before with my students. To be honest, it was a bit more of a pain that it was worth. It was a headache only because not every student had access to a device that could scan a code. My school does not have a 1:1 program, and it doesn't look like that will change any time soon. However, QR codes can be amazingly useful.

I was looking through my son's school folder and looking at all the "worksheets" and the other cool projects that come home. As I was mumbling about the amount of papers that come home, I thought, why couldn't this all be digital? Then it happened. The AHA moment. Why not do what Tony Vincent does and make QR code stickers. The teacher could send home the important work, and then store the rest online somewhere that we could access through a QR code scan. Here is the even bigger AHA moment, why don't I do that as a high school teacher? Instead of sending endless documents home at the beginning of each semester, simply send a sticker with a code home where parents could access all the files digitally, and digitally sign them. I think my desk just got even emptier.

Take a look at Tony Vincent's blog about QR codes, he offers some great suggest and tools to scan and create codes. I also use the i-nigma scanner on my android, and appreciate its simplicity. As far as making codes, I've used Goo.gl and to quickly make a code of a URL. Again, the blog referenced, offers some great tools for making QR codes. I can not wait to start making stickers to send home instead of sending piles of paperwork.


Saturday, September 20, 2014

OpenShot VIdeo Editor

The science computer lab at my school has become my adopted child. I have taken it upon myself to convert the computer lab to use all opensource software. This was mostly because the operating system, and other software on the machines constantly had issues. Trying to find an IT person to help was always more of a chore than if I could just fix it myself. Similarly, the way the Windows 7 machines were set up for students to log on, stored too much information on the local disk and filled up the 80 gig hard drive very quickly. The IT solution was to re-image the machine every six weeks or so. This started to become problematic for a lot of reasons that I'm sure you could imagine. One major concern was that the image that was used to "fix" the machines didn't contain all the science software we would like to use. Simple and common tools like java, flash,  Google Chrome, and Firefox were always missing. Then more specific tools like Stellerium, Blender, LoggerPro, or Google Earth were always missing as well.

After finally getting fed up with this process, I made a solid argument to the IT department that the science department should be allowed to be the administrators for our computer lab. Once that was awarded, we quickly wiped windows from  all the machines and installed linux. This made life so much easier. Currently, the machines all run Linux Mint 17 XFCE x64. The best part is, they all run, and are reliable. I won't go into the specific hard-rive partitions, and software, but lets just say that if a student "breaks" the the OS, it can be restored in a click of a button. Similarly, the entire system can update,  all installed software with one command. This command can be pushed out through the network as well, so all machines can update at the same time and run the latest and greatest versions of all programs for our students.

On that note, one of the latest and greatest additions to our opensource lab has been OpenShot Video Editor. I have recently been assigning students a lot more STEM work where they need to document their learning through an actual scientific documentary. Their entire problem solving and inquiry based journey culminates with a video documentary that displays their work and demonstrates understanding of the concepts needed to achieve mastery of the standard. We had been attempting to use WeVideo editor online, and YouTube editor, but found it to be a bit cumbersome to stitch a lot of video clips, images, voice, and other video magic into these programs. I have always had OpenShot on my personal Linux machines, and never really played with it much, until recently. I fired it up to pull a bunch of video clips and images from a students iPhone, and just like that, it strung them all together, and created a quick video. I quickly installed it in the Linux lab and my students were making high quality videos with ease. It is just as simple as iMovie but also has the capability to pull animations from Blender, and other screen casting tools. The really nice thing is that the opensource tool also has tools to export the video in a formats preset for Flickr, YouTube, vimeo, Picasa, Wikipedia, Metacafe, Apple TV, Xbox 360, Nokia nHD, and various DVD and Blu-Ray options.
OpenShot is an amazing opensource tool, the only downside is that in only runs in Linux. However, a live version exists, if you really wanted to use it you could download it here, and burn it do a dvd or usb and boot it on any machine without installing anything. It's pre-installed on AV Linux. A live session of this OS would also deliver a wide rang of other multimedia type of tools, again with the option to use them out without installing anything.


Here is a short video clip from a larger documentary that some of my students made. Their challenge was to design a robot that could navigate through a natural disaster to save a trapped person. When the project was over, we needed to deconstruct the robots. We figured the best way to deconstruct them was to have them battle each other in Robot Wars. (The robots can be remote controlled through a smart phone, in one shot you'll see a student controlling the tank,)


If you're in my neck of the woods come November, join me at Vermont Fest, I will be running a session about how to use the Lego Mindstorm robots to STEM-up across the curriculum. You'll get an EV3 kit, learn how to build, program and use it across the curriculum. STEM can happen in every subject, it's more than just science, technology, engineering and mathematics. These skills can be applied anywhere, and everywhere.

Thursday, September 11, 2014

Google Classroom Grading Features

Classroom for Google has streamlined my teaching and organized my use of Google drive so incredibly well, that I don't even remember how I was able to maintain order, prior to this tool. Three cool features that I enjoy and my students enjoy are involved with the assignment options of Classroom. I can make an assignment for my students with a deadline complete with a date and time, and have a variety of options for grading, commenting, and returning work.

The "Turn in" feature and "sharing."


The first option that took some students a little bit to get used to is the fact that once they turn in an assignment through google drive, they temporarily lose access to their document. Which is just like if they were to print off the document, and hand it over for a grade. Once it is in the teachers hand, it is what it is, there is no turning back. I really appreciate this feature in the tool, the students are starting to get used to this as well.

Students can also "Turn In" their document directly from their Google Doc.


The "Return" feature


Once a student turns in an assignment they temporarily lose access to edit their document, until the teacher grades and "Returns" the doc. This is a great feature that allows me, the teacher, to look at the students work, provide individualized feedback, provide a grade and return the document back to their control with comments attached. Once the document is returned the student has access again to the document, and also has the option to resubmit. Which is great if you need a student to make revisions.


The Teacher Side


Finally, the teacher side where you can grade, comment, and track submissions is very useful. I can quickly see who has turned in their work on time, grade assignments with feedback, and get it "returned" to students in a timely way. This quick check streamlines a lot of organization and makes grading much easier.


If you haven't tried Classroom for Google yet, take a few minutes and set up a class, you will find yourself wondering how you ever got by with out it, and your students will appreciate the organization of their google drive. 


Wednesday, September 10, 2014

How to merge cells in a Google Doc.

Occasionally there is a need to insert a table in a Google Doc. There is a nice easy "insert" option for a simple table. Sometimes, you have the need to be a bit fancy with those tables and want to do things like merge cells and wrap text...etc. Here is where you start bad mouthing Google Docs. In Google Docs defense, Google Sheets is built to do fancy table work and spreadsheet things. However, there is still the occasion where you need a small table with merged cells, so how do you get that to work in Docs?

It's a bit of a round-about way, but it works like a charm.

1) Make your document that requires the Merged Cells table.

2) Make a new Google Drawing. Not just insert a drawing, but create a new Google Drawing from your drive "New" list.

Why a new drawing? The insert option in the doc has limited features, but if you make an entire new "drawing" you have access to more tools and flexibilty.


3) Once you have a new drawing, name the file, and Insert a table.

4) From there you can "right-click" to gain more options, just like you might be familiar with in other word processing programs.

5) Here is the trick. When your table is done or good enough, copy the table from the drawing

6) Once it is copied (use ctrl+c), navigate back to your Doc, and click Insert>Drawing to paste your copied table in the window. Use ctrl+v to paste your "drawing" in the pop-out window.

There you go, you now have a table with merged cells in your doc. If you need to edit the table, you can now use the in doc edit features and still have access to the table options.


Wednesday, September 3, 2014

Digital Planning Tool

In my efforts to run a paperless classroom, I was in search for a digital planning book. I tried using Google Calendar, and it was tedious and messy. I tried using a running journal type of document in Google Docs, and again found it cumbersome.

I turned to Google and searched "digital planning books for teachers." The search returned too many options, so I started clicking and playing with the different options. I looked at Planbookedu and Planbook.com and accessed the free trials, but didn't fall in love with the tools enough to justify paying more than a paper planner for a digital service.

I took some time and gave Common Curriculum the good old "college try" and again found it a bit overwhelming. The one thing I did enjoy about  Common Curriculum was the ability to pull in the common core standards. The overall interface was a bit too busy for my own liking. I want somthing simple, clean, organized, and with a lot of options.


Just as it always works, right when I was about to throw in the towel and use some budget money to purchase a planner, I stumbled across Planboard. I gave it a try and discovered, it can also link in the Common Core standards as well as the Next Generation Science Standards, with ease. There are great options for viewing a single day, week, month, class by class, create alternating schedules, upload files, add links...the list goes on and on. The actual piece of the tool that allows you to write out your plan is straight forward and clean looking.  The best part is, it's FREE! I found my tool, with some patience and some help from Google. If you are in the market for a digital planning tool, take a look at Planboard it has a lot to offer, and the paid version can even interact with Google Apps. For now, I'll learn the free version, an justify the paid options later.


Tuesday, September 2, 2014

Assingments In Classroom For Google

As I am becoming more comfortable with this tool, and my students are really enjoying the streamline organization of sharing and submitting documents. Here is a quick tip to share the same assignment with multiple classrooms, in Classroom for Google. It is very intuitive, but sometimes what is right in front of our faces remains hidden.

Here's how to share the same assignment across multiple Google Classrooms.

1) Log into one of your classes and organize your "assignment"


2) Once your assignment is set, click the down arrow in the middle of the assignment box as shown above.


3) Check the boxes for the other classes who require the same assignment.


4) Select assign. 


It really is that easy. 


Sunday, August 31, 2014

How to "Reset" Your Google Calendar

Recently, a few colleagues ran into a snag with their google calendar. Their "primary" calendar was being used as to post homework assignments to students. What ended up happening was that this primary calendar, the first calendar they made, was also being accessed by other faculty in the domain to schedule appointments and events. Which became an issue since many confidential meetings are scheduled through the use of calendar. If a teacher responded to an invite, then this meeting would show on the student homework calendar! Which raises a HUGE red flag. So the issue was something along the lines of...How do I change my primary calendar instead of changing the viewing options for each event? 
 The simple answer is...you can't change your primary calendar. (well not easily)
So then, where is the reset button on my google calendar? and How do I reset it, but save all my data at the same time?

If you fall into the category of needing to "reset" your calendar for any reason, here are a few steps to restore everything back to default, and at the same time have the option to restore your data.
  • The short and simple explanation is to export your old and import it into a new. Should be as simple as clicking like 14 times...(key word is  "should be")

Here is is a more detailed explanation:


1) log into your calendar
2) on the left where it lists all your calendars...click the little down arrow


 3) Select "settings"

4) You will be sent to another page that looks something like this...
 5) Scroll down, and at the bottom of the "My Calendars" section you'll see an Import and Export option


​​6) Check the boxes next to all the calendars you care about and want to backup. This is important. If you don't save them, when you reset your calendar they will all disappear. When you are sure you have all that you want/need click the export calendars option. 

7) You will get a .zip  of you calendar data.

8) Then delete everything off your personal calendar. There are two options. 1) manually delete each event or delete your entire calendar and start from scratch. Ideally you exported all your data and have a nice archive of data as a backup, so it should be safe to reset back to the default calendar. In other words, start over as it was the first day you logged into google calendar.
9) To delete your calendar the easy way, under settings again...
click the primary calendar (should be the first on the list), scroll down and hit Delete. You will be prompted with a few warnings, and safety checks to make sure that is really what you want to do. You made a backup of everything so it should be save. This will reset you back to the google default calendar. You'll lose all labs, secondary calendars...etc. For example, my primary calendar is called "Michael Norkun" If I delete that one, it will delete all other calendars in the "my calendar" list, as well as all the calendar labs  I have enabled.

10) Now that you have a clean slate, keep your primary calendar for personal use only. Then make a calendar for every other thing you want. From there you can import the  backup you made. If your backup consisted of multiple calendars, within the .zip file you will see a series of different calendars. Select the import option in Google Calendar, and find the backup you want to restore and simply select what new calendar you want the data to go too.


This is just a quick and easy way to reset your entire calendar and start from scratch. Before you delete any calendars, make sure you have them backed up. That is my only word of caution. 

Sunday, August 24, 2014

Classroom for Google Tips

As the school year rapidly approaches, I have created classrooms within Classroom for Google. My goal is to be 100% paperless this year. As I tweak the classrooms here are a few short tips for features to use, as this new tool increases in popularity.

Use the About Page. 

  At first glance of Classroom for Google, you'll notice it has a very sleek, clean, and simple interface. Which is exactly what teachers and students want. The about page is a great place to store all those things like a course syllabus/description, copies of school documents, field trip forms, classroom homework/announcement calendars, helpful links, links to the eBooks your classes will use, and links to your classroom lesson podcast.

Change the Theme


  There are limited theme options at the moment, but based off the new menu that appears when you click on the option, it looks as though more options will soon be added. However, I would suggest changing the theme to allow for easier course identification from your home screen, and provide a nice visual for you students. Make it welcoming.


Virtual Discussions

   Use the announcement page to hold virtual discussions. Add a prompt and let students respond to each other and interact as a homework assignment.

Increase Collaboration and Creativity

  When creating an assignment for students, think outside of the box. Instead of simply sharing the directions typed in a Google doc, share a document, presentation, or spreadsheet where students are assigned to edit and collaborate on specific pieces of the same document to arrive at one larger final product.


Classroom for Google offers some unique ways to expand the classroom beyond the four walls, and create a much more tight-knit group of individuals all working together to help each other learn.


Tuesday, August 19, 2014

Google Calendar in Classroom For Google

Classroom for Google is a fantastic tool. If you have Google Apps For Education and haven't tried the tool yet, head on over and make a classroom. It is very clean and user friendly. I had a few colleagues ask me today, How can I get my homework calendar onto my Classroom For Google page? Here is a simple way to include a homework calendar/agenda/or any other variation of Google Calendar to your classroom page.

1) Make sure you have a classroom set up.
2) In your classroom click on the "About" section.
3) If you haven't done so yet, add in some information about the course, then at the bottom there is a space for resources.
4) Head to your Google Calendar for your Homework/agenda/etc... and grab the public link.
5) Paste the link in the materials sections and students will now have streamline access to their work.


How do you get the public link from your Google calendar?

1) Go to Google Calendar
2) Find the appropriate Calendar in your list on the left hand side of the screen.
3) Go into the "Calendar Settings"
4) Find the section called "Calendar Address"
5) Copy the address and paste it into your materials list in Google classroom.

Here is a short video tutorial.

Lego EV3 in Linux!

Being a science teacher I'm always looking for cool new toys and ways to incorporate STEM and get my students to learn, without realizing they are learning. I had some back to school meetings today, and discovered that the EV3 Lego Mindstorm Kits I requested had arrived. I was about as happy as a kid on their birthday. I ripped open those packages so fast and started playing...then I ran into my first issue. My science lab is Linux based...all my machines are Linux. How the heck am I going to get these things connected?

Being the tech dork I am, I found a clunky workaround, a slick but complicated workaround, and one other possibility that will probably work- it hasn't been tested yet.

The Clunky Workaround

I installed the newest version of virtualbox with the newest extension pack, and guest additions. Installed Windows 7. (I activated the aero view of course. I mean if I have to use windows, I can at least make it look a bit nicer, it's not as pretty as Linux, but it will suffice). I added my host Linux user to the vboxuser group, installed libusb-0.1 and libusb-dev, plugged in the EV3 brick via USB, and voila, the windows guest virtualbox grabbed the device. I downloaded and installed the EV3 software and I was in business.  It's clunky, because that means I need to have that available for my students on all 24 Linux mint 17 XFCE machines in my science lab :(
Again which means, I need install virtualbox on all those machines, and clone the virtual OS 24 times.

The Slick Workaround.

What's wrong with teaching kids how to write Java? I installed the Lejos NXJ EV3 software on my Linux machine and made a bootable USB (not an SD) as the directions suggest. Only because I didn't' have an SD card around. I followed the tutorial and I was able to program my EV3 brick via Java. That should be a great addition for my students when they are ready to try some coding. It's a slick workaround, because I you end up flashing the EV3 brick with java, but you wipe the Linux OS that is there. (There has got to be a way to get a Linux machine to talk to the Linux OS on the brick).

Finally the not yet tested work around.

It appears as though the USB and SD ports on the brick will mount and access files. All I need is to get the Lego software running in Linux, either through WINE (which I've found out that it probably won't work) Or, create an XP virtual machine with the software. That's right, XP. Why XP? Because I don't' need to use up or buy site licenses to get the machine to run and allow students to access the software. I can clone the virtual system without any worries. Once I download the XP iso, install it on a virtual machine, grab the Lego software, have students program and save it to a USB and plug it into the brick to run. This seems the easiest, but hasn't been tested yet. Again, since XP isn't supported anymore, I can run it without the hassle of a license, since there aren't any more security updates, I can ignore the license reminders.


Sorry for the length of this post, but there might be other Science  teachers out there with robotics kits and Linux labs running into similar frustrations. So I thought, I'd share my success story thus far.
Enjoy.

Coming soon...more on Classroom for Google, and integrating Google Calendar.

Wednesday, August 13, 2014

Google Calendar

Have you ever needed to share your calendar with more than a few people, but felt like it would take way to long to type in every individuals name? Have you noticed, you can't share directly with a contact group? Here is a quick work around.


1)    Open your Google Calendar.


2)     Locate the calendar name you want to share on the left hand side of your list.


3)    Click "Calendar Settings"


4)     On this page find the item called "Private Address"


6)     Grab the format you prefer.


7)     Head over to Gmail, and mail it off to your contact group.


Note: Using this link will only allow the people you share it with to see the event details in a news feed reader, they will not be able to edit, or create events. They will not see it in their calendar lists. This method only lets you get the calendar out to people privately so they can view it from a news reader. 

Science Help

This may not apply to everyone, however it is a great use of technology to help explain some potentially confusing science or math concepts.


20 Gifs That Teach You Science Concepts Better Than Your Teacher Probably Can


I like the animation of PI, as well as the video showing tension of falling objects. (P.S. That is a cool trick to freak out your students, try it sometime.) 

Saturday, August 9, 2014

Google Earth, Moon and Mars all Online!

Google Maps has been a "go-to" tool for me for some time. However, it just got even better. You can now see the Moon as well as Mars from Google Maps. This opens so many more educational possibilities with the tool, and the tool runs pretty quick. 

Here's how to see the Moon and Mars. 


  1. Go to Google Maps. 
  2. Change the base view to Earth. 
  3. Then zoom out as far as possible. 
  4. If you expand the options at the bottom, new options for The Moon, and Mars will be available. 
  5. Have Fun!

Friday, August 8, 2014

New School Year, New Technology

After a nice long summer break working at an alternative education school, with zero technology, I'm nice and refreshed, ready for the school year to start. Better yet, there are many new tools or updates to old tools to try with students. At the top of my list sits Classroom for Google. Having early access to the tool, allowed me to play with some features, and begin to set up some classes for this coming school year. The tool has a very simplistic interface, much like a Google + community, and offers flexibility with adding documents/files from Google Drive.

Some fantastic features of this tool are; once you make a classroom, the tool auto-creates a folder in your Google drive called Classroom, with a secondary folder nestled inside with that class name associated. This makes it very easy to store documents and files for that one class.
When you make an assignment, a new folder with the name of the assignment is created and nestled in the class folder. (confused yet? Look at the pictures below.)
When a student submits an assignment on their end, they do not have to change any sharing settings in the document, all they need to do is find the right file in their drive, and submit it. The file will magically move to your assignment folder.

I can almost see the piles of student papers on my desk, disappearing, and I can see the clutter of my drive becoming organized.

That is only skimming the surface of the tool. I will add more tips and features as I dust off my technology and start playing again. For now, enjoy the screen shots, from my new Google Open Gallery Page all about Classroom for Google.


Click the "i" icon at the bottom right for an image description. 

Thursday, June 26, 2014

New Google Doc Options

As the Google I/O continues, new Google features are being rolled out. Drive now has a great addition to enhance collaboration. There are now three lenses collaborators can quickly swap between to view a document with a different role. Collaborators with appropriate permissions can swap between an editor, viewer, and a new role that allows you to make suggestions. 

This new role essentially integrates the comments much more intuitively and color codes changes in real-time. For example, if a student were editing a document, and the teacher wanted to provide some feedback. The teacher could choose the role of "suggestion" and type in a suggestion while the student is making edits. On the student end of the document,  a pink highlight will appear in the text, with a new comment added, as well as a place holder in the document with the suggestion. If the suggestion is to change a portion of the document, the teacher can actually cross out a portion of the document, but the editor can see the changes being crossed out with the original material still present. If the student doesn't want to take the advice, they can close the comment box and the suggestion clears for both collaborators. 

This opens some great opportunities for teachers to collaborate with students to provide more real-time feedback and provides easier tools for the student to incorporate these suggestions into the document, without interrupting the flow of the editing process. Similarly, this opens more opportunities for better peer editing. Students can actually collaborate and see changes and suggestions without losing the original thoughts and ideas, to acquire one truly collaborative document. 


This image shows the new menu options. 


This image shows what the "Suggesting" role looks like. 


Here is what the "editor" role looks like.